How to Face Swap in Photoshop: 2024 Ultimate Guide for Beginners

If you've ever wondered how to perform a Photoshop face swap, you're not alone. Many users are curious about face-swapping techniques, whether for fun, creating memes, or enhancing photos. This guide will walk you through how to swap faces in Photoshop with detailed, step-by-step instructions. You'll learn what face swaps are, the scenarios in which they can be useful, and how to achieve professional-looking results using Photoshop. By the end of this article, you'll be equipped with the skills to create seamless face swaps and explore the exciting world of digital manipulation.
When to Use Photoshop for Face Swapping?
Face swap technology allows you to interchange faces in photos or videos, often used in various creative contexts. Here are some scenarios where face swapping in Photoshop can be particularly useful:
- Creating Memes: Face swaps are a popular way to create humorous content. You can swap your friend's face with a celebrity or a classic movie character to generate laughs.
- Digital Art and Manipulation: Artists often use face swaps to create surreal or imaginative compositions. This technique can help you explore new creative avenues.
- Photo Restoration: If you have old family photos where some faces are damaged, you can replace those faces with clearer images to restore the photo's integrity.
- Social Media Content: For influencers and content creators, face swapping can add an engaging element to videos and photos, capturing the audience's attention.
- Personal Projects: Whether it's making a fun birthday card or a unique gift, face swapping can personalize your projects and make them memorable.
How to Use Photoshop for Face Swapping
Face swapping in Photoshop is a more advanced technique that involves several steps, including background removal, blending, and color adjustment. Below, I’ll guide you through the detailed steps to swap faces in Photoshop effectively.
Step 1. Getting Started
Before diving into the steps, make sure you have:
- Two photos: One with the face you want to swap (source image) and another where you want to place the face (target image). Ensure both photos have similar lighting and angles for a more natural blend.
- Adobe Photoshop installed on your computer.
Step 2. Open Your Source and Target Images
Start by opening both images in Photoshop:
- Go to File > Open and select your images.
- Ensure the images have similar lighting and angles for a more natural blend.
- Duplicate the background layer to preserve the original image and effectively execute touch-ups.
Step 3. Extract the Face From the Source Image
To swap the faces, you need to isolate the face from the source image:
- Select the Lasso Tool or Pen Tool from the toolbar. Carefully trace around the face you want to swap, including all the facial features: eyes, nose, mouth, and hairline.
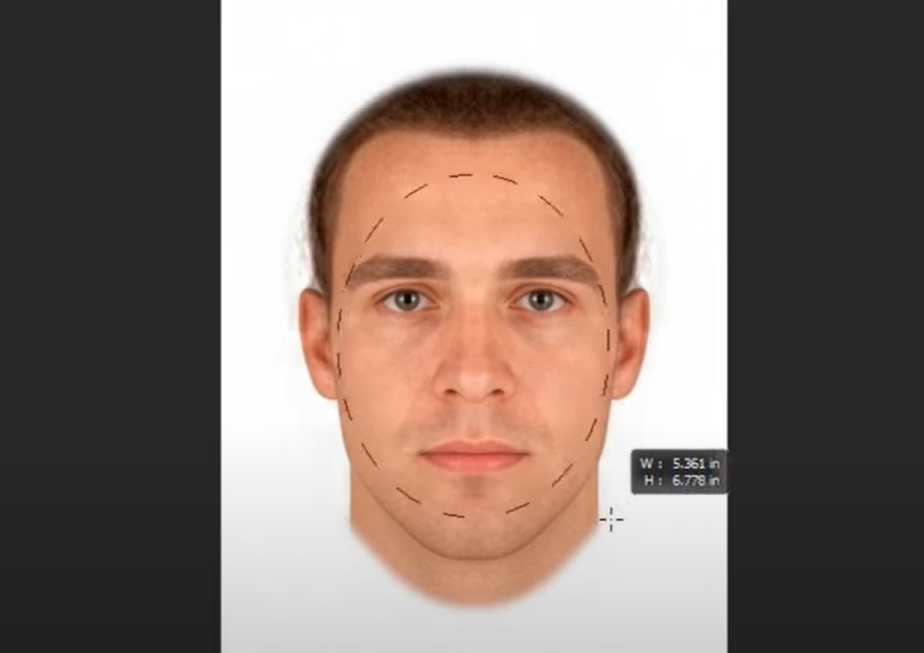
- Once selected, press Ctrl + C (Windows) or Cmd + C (Mac) to copy the selected area.
- Save the chosen face as its own layer for easier adjustments and alignment.
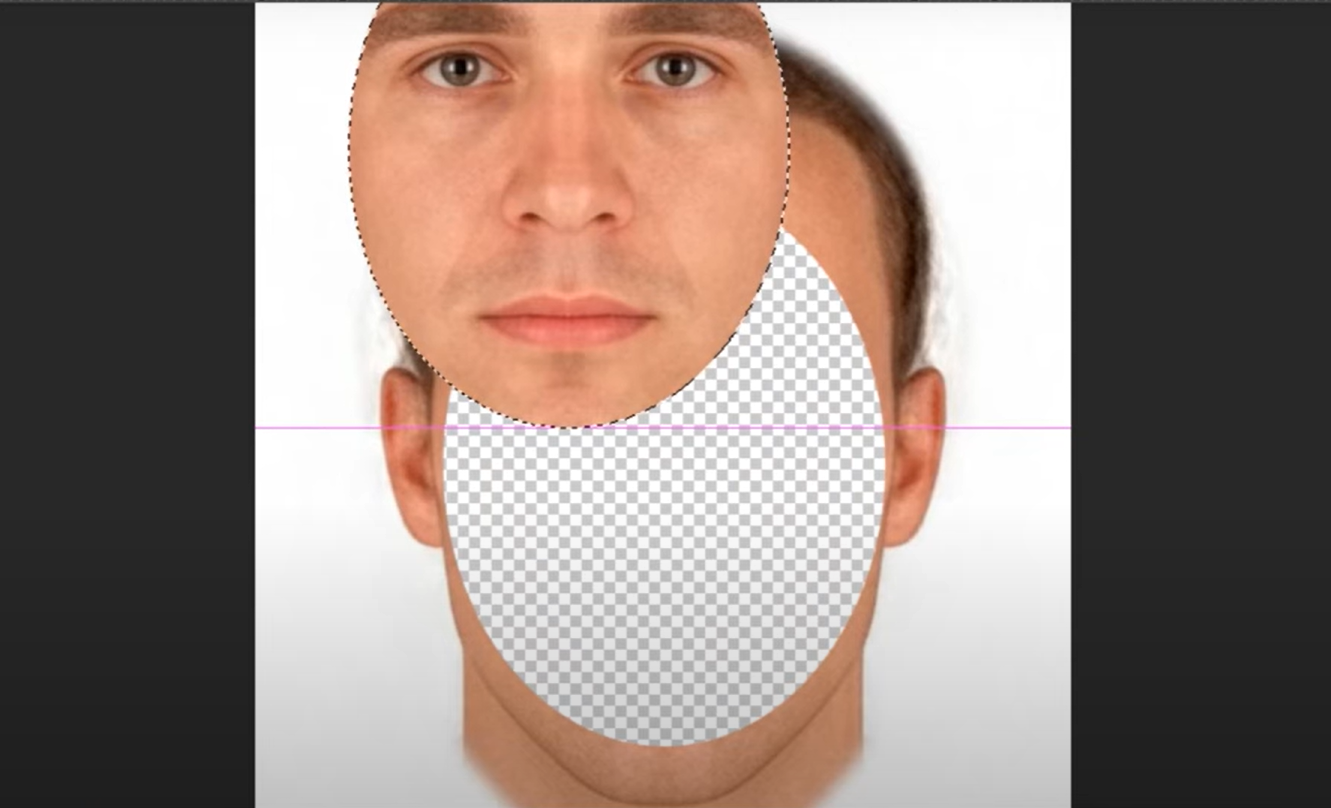
Step 4. Paste the Face onto the Target Image
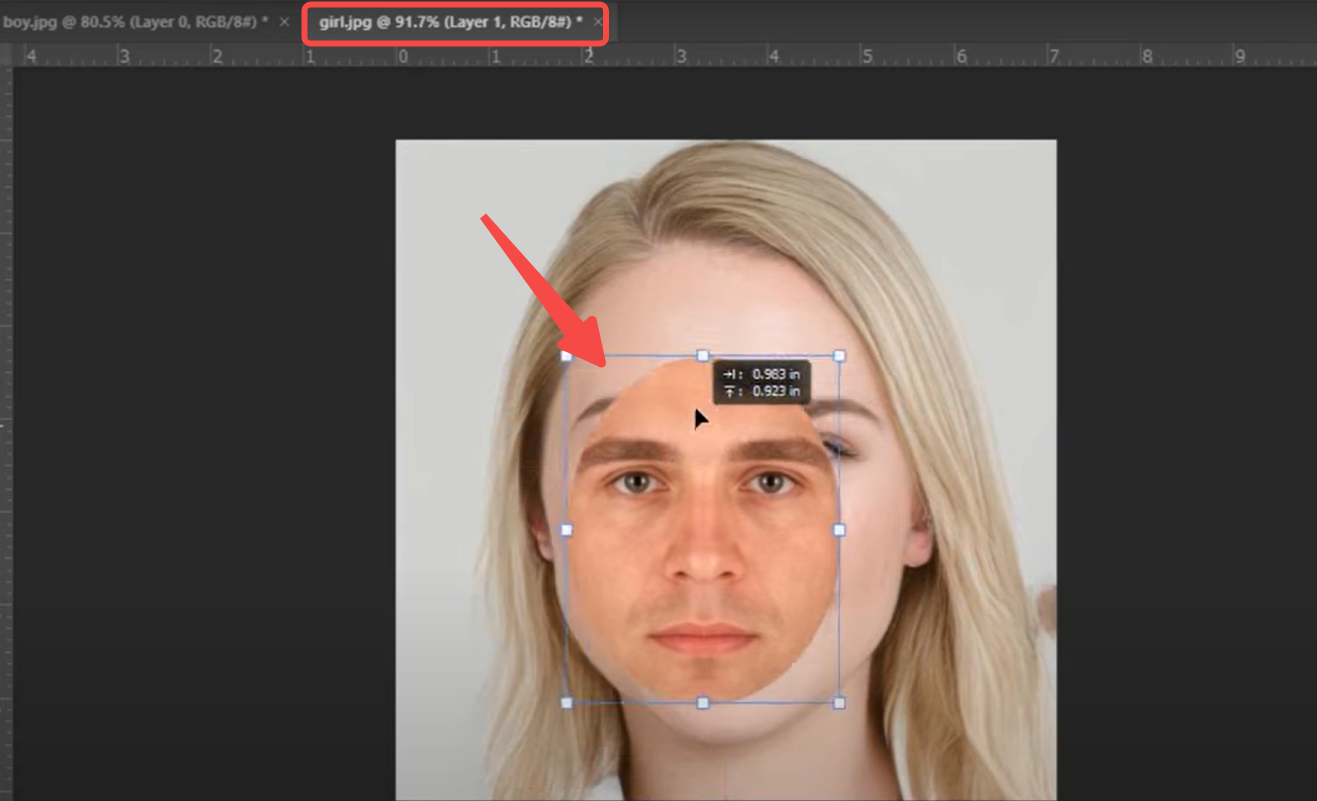
Switch to the target image:
- Press Ctrl + V (Windows) or Cmd + V (Mac) to paste the copied face.
- The face will appear as a new layer. Use Ctrl + T (Windows) or Cmd + T (Mac) to enter Free Transform mode.
- Adjust the size, position, and angle of the face to match the target face.
- Set the pasted face as the top layer for better alignment and blending.
Step 5. Blend the Face with the Background
To make the swapped face look natural:
- Select the face layer and go to Layer > Layer Mask > Reveal All.
- Use the Brush Tool with a soft edge and higher opacity black brush to paint over the mask layer and reveal the face underneath, blending it into the background. Adjust the brush size for more precision.
Step 6. Adjust Color and Brightnes
To ensure the swapped face matches the target image:
- Create a new Adjustment Layer for Hue/Saturation or Brightness/Contrast.
- Adjust these settings until the skin tones and lighting look similar to the surrounding areas.
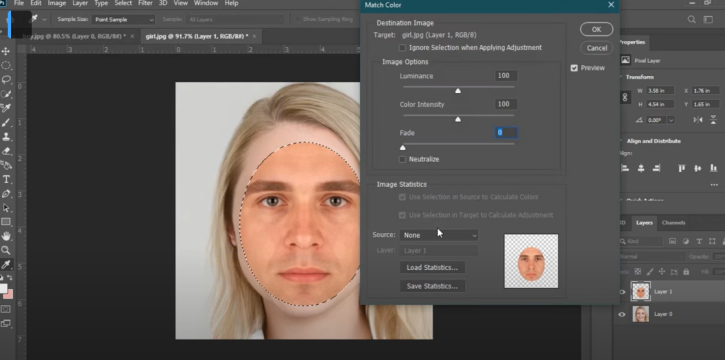
Step 7. Match Color for Natural Blending
To ensure the swapped face blends seamlessly with the target image:
- Go to Image > Adjustments > Match Color.
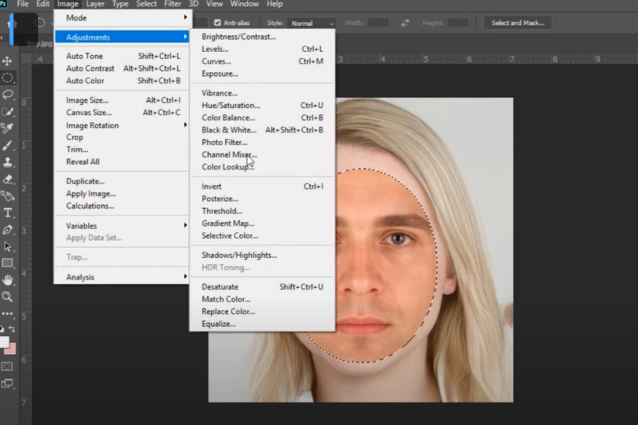
- In the Match Color dialog, set the Source to your original image (e.g., "girl.jpg").
- Under Layer, select Layer 0 (the layer containing the target face).
- Click OK to apply the adjustments. This helps harmonize the color tones between the two faces for a more realistic look.
Step 7. Contract the Face Selection
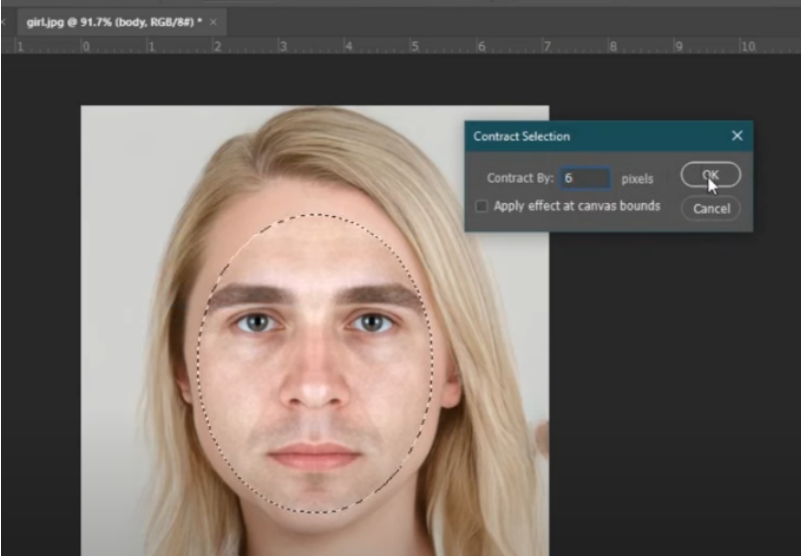
Copy Layer 0 (the original target image layer) by pressing Ctrl + J (Windows) or Cmd + J (Mac). Rename the copied layer as “body”. Rename the pasted face layer as “face”.
Select the “face” layer. Go to Select > Modify > Contract and enter 6 pixels, then click OK. This helps create a smoother transition between the face and the target image.
Step 8.Final Touches
Make any additional refinements:
- Use the Clone Stamp Tool or Healing Brush Tool to fix any visible seams or unnatural edges.
- Zoom out to check the overall effect, making sure everything looks seamless.
- Fine-tune the face swap for better creative control and a natural look.
Step 9. Save Your Work
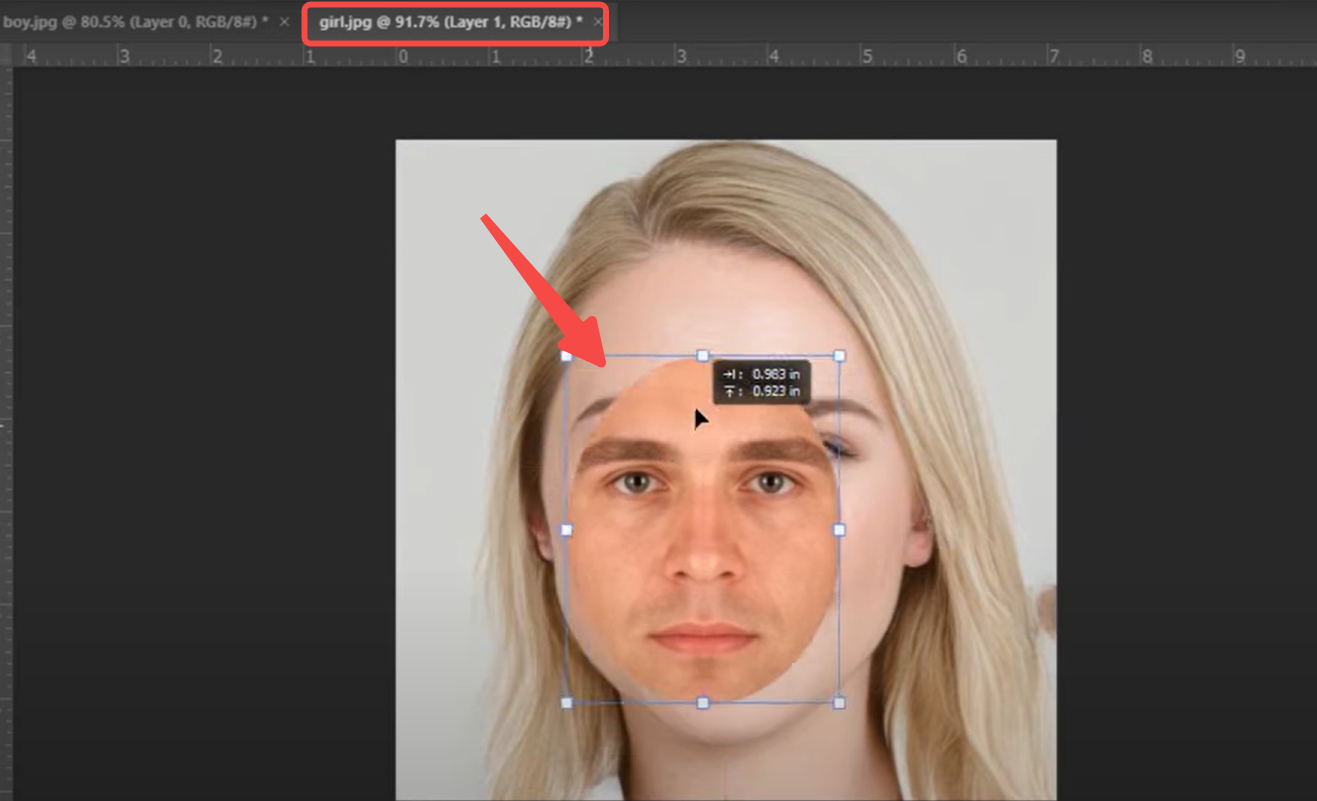
Switch to the target image:
- Press Ctrl + V (Windows) or Cmd + V (Mac) to paste the copied face.
- The face will appear as a new layer. Use Ctrl + T (Windows) or Cmd + T (Mac) to enter Free Transform mode.
- Adjust the size, position, and angle of the face to match the target face.
- Select and modify the body layer to ensure a seamless integration with the pasted face.
- Set the pasted face as the top layer for better alignment and blending.
How to Face Swap Online for Video & Photo with AI
While Photoshop is a powerful tool, it can be complex for beginners and requires a significant amount of time and effort. Luckily, there are online free AI face swap tool that simplify the process and allow you to perform face swaps quickly and easily. Here’s how you can do it:
Aitubo offers a user-friendly platform for AI face swapping in videos and photos without the need for extensive editing skills. With just a few clicks, you can create fun and realistic face swaps in no time. This method is perfect for those who want quick results without the learning curve of Photoshop. Additionally, the technique of face swapping using AI can correct imperfections by blending faces from the same person captured in different images, enhancing photography skills and creating unique and memorable portraits. Below, you’ll find detailed steps for using Aitubo’s face swap features for videos and photos.

How to Face Swap Video & Photo Online Free
Step 1: Upload Your Video/Image
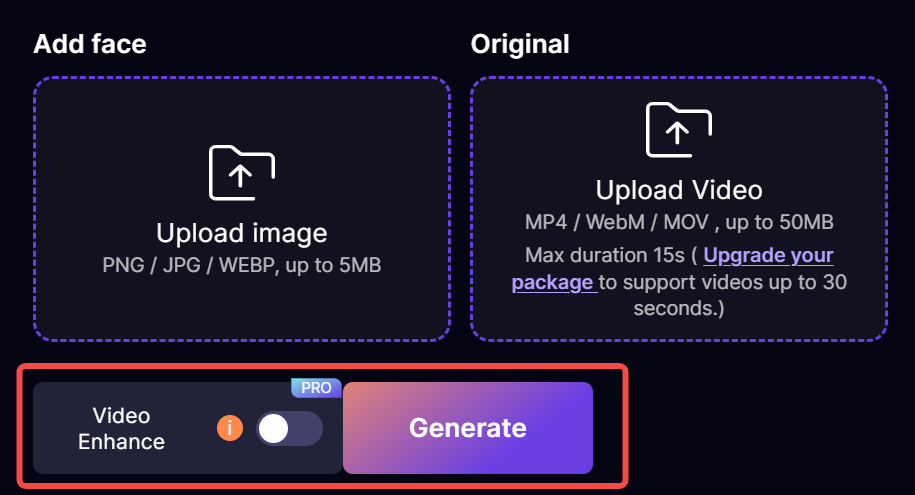
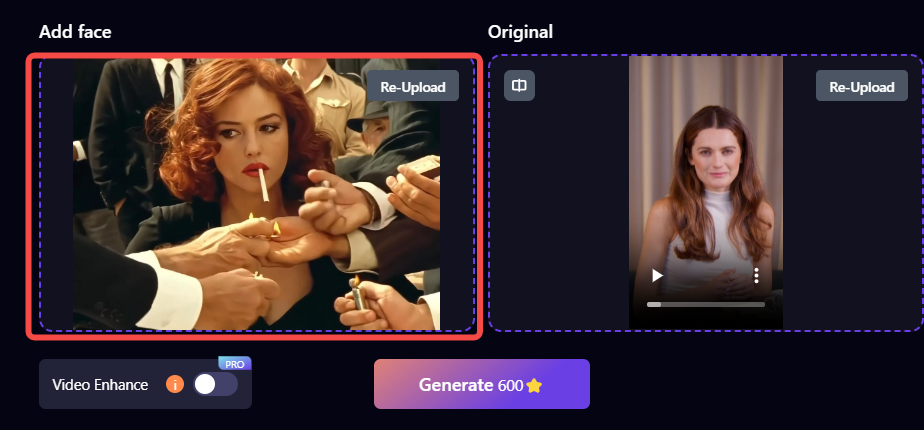
Open Face Swap Tool, please choose 'Image Face Swap' or 'Video Face Swap' according your need. Click on the button labeled 'Upload Image' or “Upload Video” to open a file dialog. Then select the video or photo file from your computer or smartphone. Aitubo supports formats like MP4, AVI, and MOV. For best results, choose a video that is at least a few seconds long to provide enough context for the face swap.

Step 2: Upload the Target Face
Upload the image of the face you want to swap with. This could be a celebrity or any other recognizable face. Note: Ensure the target face is front-facing for more realistic results; side profiles may lead to unnatural swaps.

Step 3: Initiate the Swap
Generate the Face Swap: Click the “Generate” button after uploading both images. The tool will begin processing your request. Avoid navigating away from the page during processing to prevent interruptions.
Step 4: Preview and Download
Review the Results: Once processing is complete, a preview of the face-swapped video will display. Watch closely to ensure the face swap looks realistic. If satisfied, click the “Download” button to save the final product to your device. Make sure to select the appropriate video quality (e.g., HD vs. standard).
Conclusion
In this guide, we've explored how to swap faces in Photoshop step-by-step and introduced an easier alternative with Aitubo’s AI Face Swap tool. Whether you choose the traditional route with Photoshop or opt for the convenience of online tools, face swapping can unleash your creativity and provide endless fun. Remember to respect privacy and copyright when using face swapping technology. Happy swapping!
Frequently Asked Questions
Q1: What is a Photoshop face swap?
A1: A Photoshop face swap is a digital editing technique that allows you to interchange faces between different photos. This involves using two photos with similar lighting and angles, isolating a face from one image, and blending it onto another, creating a seamless and often humorous result.
Q2: Is it difficult to perform a face swap in Photoshop?
A2: While face swapping in Photoshop can be challenging for beginners, it becomes easier with practice. The process involves several steps, including selecting the face, adjusting size and position, blending, and color correction. Following detailed guides can help you master this technique.
Q3: What tools do I need in Photoshop for face swapping?
A3: Key tools for face swapping in Photoshop include the Lasso Tool or Pen Tool for selection, the Move Tool for positioning, and various adjustment layers (like Hue/Saturation and Brightness/Contrast) for blending colors. The Brush Tool is also essential for refining edges. Additionally, the Eraser Tool is crucial for performing touch-ups, as it helps reveal layers beneath by carefully erasing specific areas of the top layer to create a seamless blend with the original background layer.
Q4: Can I swap faces with images that have different lighting conditions?
A4: It’s best to use images with similar lighting conditions for more natural results. However, you can adjust the brightness and color balance in Photoshop to help the swapped face match the target image better.
Q5: Is there a way to swap faces in Photoshop without advanced skills?
A5: For those who find Photoshop complex, there are online AI face swap tools like Aitubo that allow you to perform face swaps easily without the need for extensive editing skills. These tools provide a user-friendly interface and quick results.
Q6: Can I use Photoshop face swaps for commercial purposes?
A6: Using face swaps for commercial purposes can be legally complex, especially if you use someone else's image without permission. Always ensure you have the right to use any images involved, and consider obtaining consent if necessary.
Q7: How can I make the face swap look more realistic?
A7: To achieve a realistic face swap, pay attention to details such as color matching, blending edges smoothly, and adjusting lighting and shadows. Utilizing the 'auto blend layers' feature in Photoshop can significantly help in correcting lighting and skin tone discrepancies, making the face swap appear more natural. Using high-resolution images and taking time with adjustments will also enhance the final result.
Q8: Are there any ethical considerations when using face swapping?
A8: Yes, ethical considerations are important. Always respect individuals' privacy, avoid using images without consent, and refrain from creating misleading or harmful content. Responsible use of face swapping technology is crucial.
Q9: What should I do if the face swap looks unnatural?
A9: If the face swap appears unnatural, check the blending of the edges, adjust the colors to match the target image, and refine the mask used to blend the face. To blend the images effectively, add a white mask layer to the top image and paint over the face you want to replace, revealing the underlying face from the bottom layer. You can also use tools like the Healing Brush to fix any noticeable seams.
Q10: Can I swap faces in videos using Photoshop?
A10: While Photoshop is primarily a photo editing tool, you can perform simple face swaps in video frames. However, for more complex video face swapping, dedicated video editing software or AI face swap tools may be more effective.
